Nosecone Tutorial
Previous
Page:
1
|
2
|
3
17.
Draw the middle-of-nosecone circle
- Select the Use (Project/Convert) tool

- Click on the outer circle
- That line will bold, as it becomes part of your sketch
- Draw another, larger circle, making sure to snap it to the center
18.
Dimension the middle-of-nosecone circle
- Select the dimension tool

- Click your new circle's edge
- Set the dimension to 0.781
- Click the green check

19.
Extrude the middle-of-nosecone
- Select the extrude tool

- Click on "Sketch 3"

- Click on Add to add to your part instead of creating a new part
- Set the Depth to 0.1 in
- Click the "Opposite direction" button
 to make ring go down along tube
- Click the green check
20.
Start the cone sketch
- Start a new sketch

- Select the Front plane

- Right click and select View normal to sketch plane to line up your view
21.
Import lines to connect to
- Select the Use (Project/Convert) tool
- Click on the top of the larger circle
- Click on the right side of the circle
- Those lines will bold, as they become part of your sketch
22.
Draw the nosecone
- Select the "3 point arc" tool

- Set the first point on the rightmost point in your sketch
- Set the second point somewhere above your part
- Set the third point so the arc looks like a nosecone
23.
Constrain the arc
- Select the "Tangent" tool

- Select the arc
- Select the line right below the arc, and you'll see the arc straighten to line up with that line
24.
Draw top line
- Select the "line" tool

- Start: on the top of your arc
- End: horizontal, to the center of the rocket
25.
Offset nosecone lines
- Select the "offset" tool

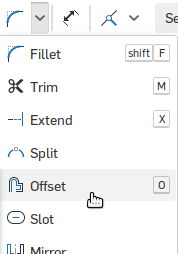
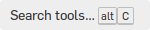
- Can't find it? »
-
Try the Search tools feature, type "Offset" into the box.
- Select the arc and the horizontal line
- Drag the arrow to make the offset smaller than the arc
- Press Enter and set the dimension to 0.05
26.
Draw a line connecting to the offset
- Select the line tool
- Draw a line straight down from the outside to the inside of the nosecone
27.
Constrain that line to be vertical
- Select the "Vertical" tool
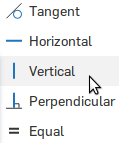
- Click on the line from above
- You should see that line turn black as it becomes fully constrained
28.
Start dimensioning
- Select the dimension tool
- Click on the horizontal line and set its dimension to 0.15
29.
Finish the nosecone sketch
- Select the dimension tool
- Click on the top line and then the bottom line and set the distance between them to 2.0
- Click the green check
30.
Revolve the nosecone
- Select the "Revolve" tool

- Select "Sketch 4"

- Set the axis
- Select the "Revolve axis" box

- Select the tube
- Click the green check
31.
Fillet the top of the nosecone
- Select the fillet tool

- Click on the top ring of the nosecone
- Set the radius to 0.10
- Click the green check
You finished the nosecone!