Build the nosecone tether connection


in which we constrain our 3-point arcs

19. Create a plane for the nosecone tether sketch

  • Now we'll add a spot for the nosecone and parachute to tie on to

  • Start a new plane with the plane tool
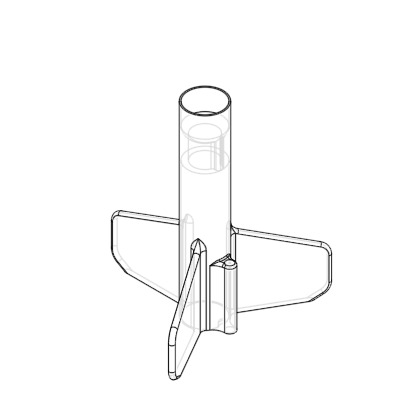
  • Select the top face of your tube (the side opposite of where it connects to the lower body).
  • Set the offset to 1.25 in
  • Click the "Opposite direction" button to make your plane fall inside your tube
  • Another way »
    • You can use negative offsets to also flip the direction in one step (-1.25 in).
  • Click the green check

20. Start the sketch for the nosecone tether holder

  • Start a new sketch
  • Select the plane you just created
  • Select the "Use (Project/Convert)" tool
  • Click the inside circle on the body tube

21. Sketch the outside of the tether holder

  • Deselect the "Use (Project/Convert)" tool by pressing Esc
  • Align your view to the sketch plane by clicking "Top" on the view cube
  • Select the "3 point arc" tool
  • Keyboard shortcut »
    • The 3-point (standard) arc, a sketch tool, uses the letter a.
  • Set the first point on the circle, above the centerline
  • Set the second point on the circle, below the centerline
  • Set the third point so the arc is in inside the tube

22. Constrain the arc's center to the circle

  • Select the "Coincident" tool
  • Keyboard shortcut »
    • Many of the sketch constraints also use keyboard shortcuts.
    • Rather than teach you each one, you can learn them by viewing the displayed letter in dropdown menus or hovering over the tool's name in the interface.
    • Note that "circle" is c, so "coincident" must be something else.
  • Select the point that is the center of the arc you just created
  • Select the bold circle, and you'll see the point jump onto the circle
  • What is a constraint? »
    • Constraints fully define the elements of your sketch.
    • A sketch that is not fully constrained can be dragged around into different positions
    • A fully defined sketch is in exactly the one possible position
      • and the lines turn from blue to black
    • If you didn't constrain your sketches, your final result could fall within a range of possibilities. Don't leave your CAD models to chance.

23. Constrain the arc's center to the centerline

  • Select the "Horizontal" tool
  • Select the arc's center
  • Select the origin point, and you'll see the point jump to the line and turn black
    • (black = fully constrained)

24. Draw the center circle

  • Select the circle tool
  • Draw a circle anywhere inside your arc and the tube (make it small)
    • (we'll constrain it in a moment to be exactly where we want)
  • Select the "Horizontal" tool
  • Select the circle's center
  • Select the origin and you should see the circle snap to the center

25. Dimension the left gap

  • Select the dimension tool
  • Click the circle's edge
  • Click the tube's circle that you have been using
  • Set the dimension to 0.01 in

26. Dimension the circle's diameter

  • With the dimension tool still selected:
    • Select the circle
    • Set the dimension to 0.13 in

27. Dimension the gap on the other side

  • With the dimension tool still selected:
    • Click the circle's edge
    • Click your 3-point arc
    • Set the dimension to 0.025 in
  • Did you notice how everything turned black? »
    • Black lines mean, “fully defined,” which means that you have told Onshape exactly where the line is.
    • If a line is blue, it means that there are still things to be constrained or dimensioned.

28. Trim the outer circle, finish sketch

  • Select the "Trim" tool
  • Keyboard shortcut »
    • Since t is taken by "tangent", we use the last letter m for "trim".
  • Don't see the trim icon? »
    • On narrow screens, items are hidden in menus. Trim collapses into the menu with sketch fillet
  • Select the part of the circle outside of the arc

29. Extrude the tether holder

Complete the feature that attaches the parachute and nosecone to the main rocket body.
  • Select the extrude tool
  • Confirm that your newly created sketch is selected.
  • Set the depth to 0.75 in
  • Click the "Opposite direction" to make the extrude go towards the bottom of the part
  • Click the green check

30. Fillet the tether holder

  • Select the "fillet" tool
  • Click the arc on the edge of the tube and the holder
  • Set the radius to 0.15 in
  • Select the same arc on the bottom of the holder
  • Click the green check

31. Exit section view

  • Select the view cube menu
  • Select "Turn section view off"


You finished the fuselage!


Next up are the fins + booster